Friday, February 26, 2016

Pretty Palettes - February Challenge

Late to the party again...

I started this pendant last weekend but just got busy throughout the week.  The inspiration photos this month are images of bobbin lace and the story behind making it.  I find it interesting that no matter who we are or where we come from or what little or vast amounts of resources we have, we humans always seem to strive to want to and to actually make beautiful things.  And sometimes, even with more limitations, the most creative items are made!

The bobbin lace images made me think about how to create lace with my jewelry supplies.  I created a framework with 16 gauge wire and my Thing-A-Ma Jig.  I've had mine for several years and it is all plastic but have you seen the ones sold in stores now?  They are all metal and look very sturdy!

After making the framework, I decided on a pattern slightly reminiscent of one of the images in the inspiration post and used 24gauge silver Artistic wire to wrap the sides and for the middle.  The seed beads are a pearly white color that go with the subtle cream colors of the bobbin lace.  Is all bobbin lace white?  Is that part of what makes it bobbin lace?  


Just a little pink accent with some Bead Gallery pink stone beads and a silver chain that has a tiny silver accent bead in between some of the links.

Check out what everyone else did with this inspiration here:  http://www.halcraft.com/pretty-palettes/pretty-palettes-february-reveal-3/

Tuesday, February 23, 2016

Art Bead Scene February Challenge

I decided to participate in the February Art Bead Scene Challenge.  The inspiration picture is very 'Vogue'.  I like the era when the picture comes from - maybe because it reminds me a tad of the current season of Downton Abbey.  And I like the structure and shapes. 


I had ideas in my head of how I wanted my jewelry to go and my piece came out vaguely like my imagination...
This necklace is made with a combination of wood beads, hand-painted wood beads, blood orange lampwork rondelles by Jodie Marshall, seed beads, blue stone beads and the loveliest glass beads by Beadfairy, which are the blue and silvery-white striped barrel beads and the lipstick red mini-ribbed spheres.

The picture is taken in bright sunlight, which is not ideal for photographing jewelry but, since I rely on natural light to take my pictures and we've only had glorious sunny (warm!) days around here (Yay!), this will suffice. 

Seeing the Vogue picture right above my necklace, makes me see what could be improved, and by the end of the month, I may still alter the piece.  You see, the creamy beads are actually painted wood beads.  They are painted with Vintaj Ranger Patina Inks.  First, I covered the beads in two coats of 'agate' and then painted the splashes of color with 'cobalt' and a mix of 'cinnabar' and 'rust', and then glaze.  I think the color would fit more with the original illustration had I not mixed the cinnabar and rust quite so well, maybe left a little more orange showing or if I had used the 'garnet' patina (but I don't own that color!  Also, I think I like the orange-red lampwork beads more than I thought I would.  

Of course, when I am designing, it is in my basement with lots of unnatural light, so some of the color disparities are more noticeable with the bright, bright sunlight!

My original idea was to paint  the beads with the same pattern as the dress in the illustration.  The bead on the right (below) was the first I tried on and it started looking a little Charlie Brownish.  The bead on the left (below) was my 2nd attempt and I actually used a headpin as my 'paintbrush'.  The pattern is nice but for the necklace, I think the abstract brush strokes work well. 
Overall, I think the necklace would look great with a simple solid color top - adding some fun to an everyday outfit!

Monday, February 15, 2016

Halo Earrings

I wish I was more computer literate.  I have great ideas of what could be but no idea (or desire to learn) how to carry my ideas out.  First, I would create a ravelry site for beadweavers.  Do you knit or crochet?  If you do, then you know what ravelry is all about.  The best compilation of patterns, tips, kinds of yarn to use and how the patterns look in real life.  I love the set-up and envision it for beadweavers.
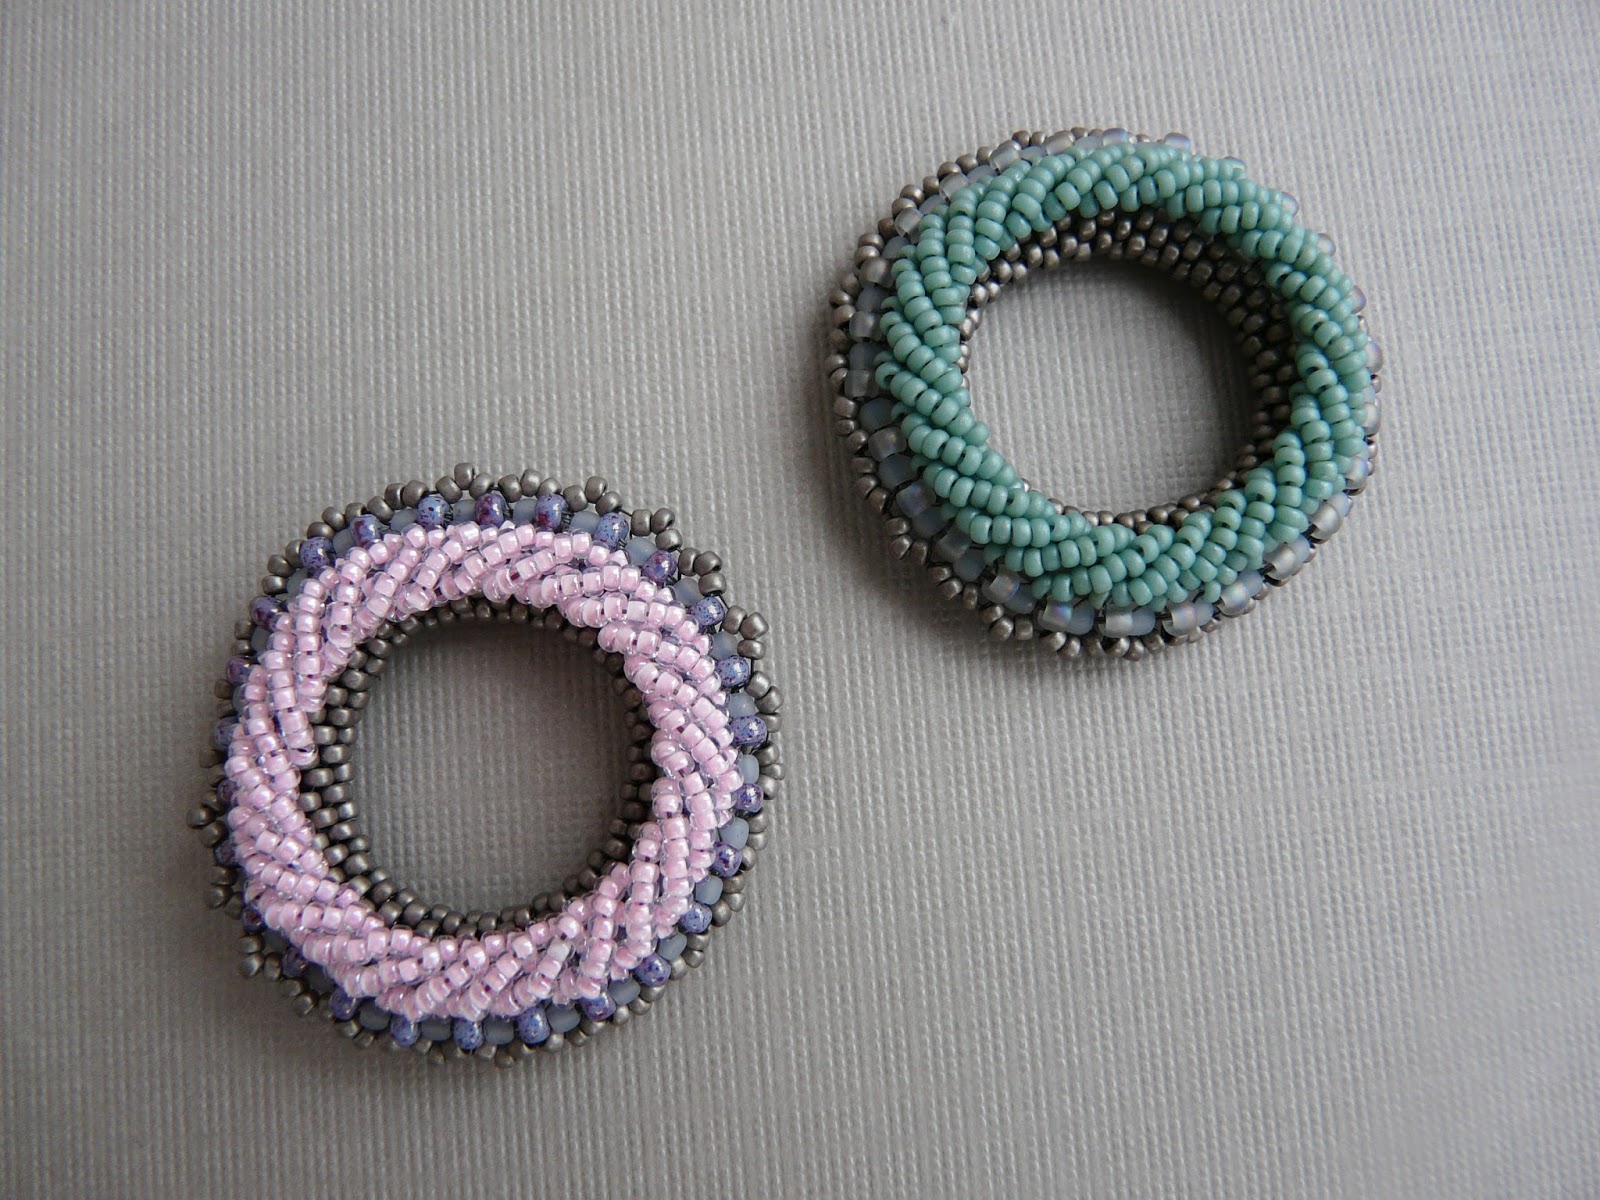
*This is the front of 4th & 3rd attempts.

We could include the pattern, the exact type of beads we used (specifically, what brand! - see below), the stringing material, and the colors, even needle size.  And most importantly, include tips for the average beader.  I know what patterns call for, but sometimes, we need to use what we have at hand and something this works and sometimes it doesn't!

This week, I decided to try out the Halo Earrings by Lisa Kan.  This pattern is from the February/March 2016 Beadwork magazine.  I liked the structural look of the beadwork and the fact that it was an earring (so it wouldn't take forever!).  Well, these were a labor of love.  And, honestly, a kit would have been quite nice. 

Before, I begin, I should say the pattern calls for 11 Japanese seed beads and 15 Japanese seed beads. 

First, I tried the pattern with some purple glossy speckled 11 seed beads from Tamara Scott and metallic silver 15 rocailles (from Fire Mountain Gems).  Well, I kind of thought the purple beads seemed on the larger side for 11 seed beads, so the initial circle was very tight and difficult to pull together and... it ended up not too much like a donut circle and more like a circle in the shape of a Pringles potato chip. 
**These are #1 & #2 attempts.  (before embellishments)

So, I tried again with some shiny greenish 11 seed beads, that on comparison, actually looked close in size to the purple speckled 11 seed beads & with the metallic silver 15 rocailles.  Again, the end result was of a Pringles potato chip.  And, working with two very shiny beads was making my eyes cross-eyed!  Way too hard to see, even with sufficient lighting and reading glasses!
**The 11 seed beads from the 14st and 2nd tries.  They purple one looks just slightly bigger than the greenish-metallic one.

**These are the two different 15 seed beads.  The one on the left is a size 15 used in #3 & #4.  The one on the right is a rocaille, used in #1 & #2.

So, then I thought it might be the rocailles causing the problem.  The 3rd time, I tried all new beads - Toho transparent rainbow frosted black diamond 11 seed beads and round matte metallic silver 15 seed beads (from Tamara Scott).  And this combination worked perfectly (and was so much easier to see!). 
**These are the 11 seed beads from #3 and #4 attempt.  They look the same size, don't they?

So, I thought I would try a 4th time with the purple glossy speckled 11 seed beads again and the round matte metallic silver 15 seed beads (from the 3rd attempt).  And... this one also came out like the Pringle shape but not as bad as the first two, so I finished the piece to see if the embellishments would help pull it straight.  They kind of worked, but the piece is still a little wonky in shape.  (See the picture up above - it has pink embellishment beads.)
*This is the back of 4th & 3rd attempts.

So there you have it!  The type/brand of bead really does matter for the integrity of the donut structure!  (Learned the hard way).  And, wouldn't this be nice to include in a beadweaving ravelry for others to learn from my mistakes?

One more tip - the beaded bead really doesn't come together until that last Finishing step.  It really pulls everything into place and makes the pattern pop!

Friday, February 12, 2016

Learning Kumihimo - Melange de Perles

This is another kit review.  Yah!  I learned how to do kumihimo.  I've seen a lot of the corded kumihimo and wasn't as interested in the style until I saw kumihimo with beads.  Wow!  What awesome designs out there. 

And this design - Melange de Perles Necklace by Adrienne Gaskell from the December 2015/January 2016 issue of Beadwork is gorgeous! 

I was fortunate to get a kit - because the beads and end result are very drool-worthy! -And they are gone.  When I was stringing the beads on the cords, my kit was missing some of the 3mm khaki rainbow ris magatamas (104 to be exact).  I had some other drop beads in my stash that were a matte purple iris color and would have fit in beautiful with this necklace, so I started adding them or trying to add them to the C-Lon cords.  But even with making sure the tip of the cord had glue on it to make it more like a needle and trying to squeeze the tip into a smaller slant, I could not get my purple drop beads onto the cords.  Why do beads that are otherwise the exact same size have to have different size holes?? How frustrating!!!   Anyhow, I wrote to interweave and got the extra beads (and some) mailed to me so I could finish stringing the beads. 

This was my first time doing kumihimo and I will admit that I should have probably started with something not as beady.  I learned the hard way about the placement of the beads when they go to the center of the disc - the beads need to go under the strings.  I originally put them on top of and in the middle of two of the cords - and, well, after a few rounds, I noticed that mine didn't look like the picture- in fact, the cords show up as a line on the outside of the rope.  So, a look at a video on how to do kumihimo with beads and I eventually figured it out. 

I also learned that if you mess up, its best to go backwards to undo everything - like with knitting.  After doing about 8 rows of beads, to undo the kumihimo, I decided that I would just pull all the cords out the holder and untangle.  But that was a HUGE ever-loving mess that took me quite a while to put back into a workable arrangement. 

It was actually quite fast once all the beads were strung and I stopped messing up!

And the result - the necklace feels as good as it looks. I love wearing it because it is soft on my skin (I definitely have some sensory issues with scratchy necklaces) and it doesn't get tangled with the hairs at the nape of my neck and so far it always stays in place - the back clasp stays in the back and the heavier front stays in the front.  An awesome necklace to make and I'm looking forward to trying some other beaded kumihimo ropes!


Monday, February 8, 2016

A Poppy Bracelet

Last Friday was National Wear Red Day.  That day is a 'massive national public awareness day to "go red" to bring attention to the leading killers of women - heart disease and stroke.' 
I am a nurse and previously worked as a Health and Wellness Planner for a company.  So the reason for this day has a great place in my heart.  To know that most heart disease and stroke is preventable, yet still kills 1 in 3 women, shows how important education and awareness is!  And I can attest that a lot of women don't know their risks nor that it is big killer of women.

Part of my plug for National Wear Red Day ties into jewelry (of course!).

I've been working on a beadweaving kit.  I know that kits are not real popular for people who design jewelry - because really, there is no designing, just making in a kit.  But I'm NOT a beadweaving designer and still trying to figure out techniques - which I think kits are great for.  I learn a new technique and produce a beautiful wearable piece of jewelry - without the pesky annoyances of picking colors that go together and figuring out if I have all the right seed bead sizes (and seed bead brands) that will work in a pattern (and, boy, does that matter - as I'll write about in a future post!).

So, here is the Poppy Beadwoven Bracelet.  This one is by Glass Garden Beads, and I purchased it from Fusion Beads (but they don't have it on their website anymore). The picture on the website was very over exposed and it was hard to tell how it was actually going to turn out.  Here it is in real life: 

 I originally planned on making it for Christmas.  The colors are quite lovely for Christmas but life took me to other things in December and instead the bracelet got finished in January.  It actually worked up a bit faster than I had first anticipated and is really quite a lovely design. Eight flowers fits my 5 3/4" inch wrist perfectly and it stays put when I wear it - which is what I like. 

And the best part -was that the bracelet went perfectly with my red outfit for National Wear Day!